Thursday, November 24, 2011

Ultimate Windows Customizer

There are Hundreds of free utilities available on the web to tweak and customize Windows 7. Tools are available to customize Windows Explorer, logon screen, start orb, taskbar, Windows Media Player (WMP), context menu and various other aspects of Windows 7. We have already listed the best customizations tools in our best free tools to customize Windows 7 article.


Most of the tools available to customize Windows 7 offer options to customize only one or two areas of Windows 7. For instance, you can use Logon Changer software to personalize the logon screen only. So, if you are looking for an all-in-one free tool to customize your Windows 7, download and try Ultimate Windows Customizer software.

Ultimate Windows Customizer is a free tool for Windows 7 operating system. It includes tools to tweak and customize Windows Explorer, Context Menu, Logon Screen, Windows Media Player, Taskbar, Start orb, Libraries and other areas of Windows 7. 


It’s a nice tool if you would like to personalize default look of Windows 7. The developer of this tool has also included some advanced tools such as System File Checker, Restart Explorer, Replace It, RegOwnIt, and System Restore Creator. We suggest you create a system restore point before making any changes to the system.


Do note that this is not a portable software and you need to install it. Also note that this program doesn’t support Windows 8 at this point of time. Support for Windows 8 will be added in upcoming versions. This program can’t be installed on systems with screen resolution smaller than 1024 x168.


Wednesday, November 23, 2011

Change Win 7 Start Button

This freeware portable app allows you change the Windows 7 Start Orb or Button easily. This freeware is a propriety of thewindowsclub.com

If you are bored of look at the same old Windows 7 Start Orb, you can now change it easily.

Click on Select & Change Start Button to select a custom Start Orb


The program will backup you original explorer.exe, change the start button and restart explorer.exe.


To restore the default Start Orb and explorer from the backup, click Restore Original Explorer Backup.
The next time you want to change the start orb and you start the app, it will appear like this:


I have tried & tested it on Windows 7 Ultimate 32-bit, personally and it works like a charm. Right  click the program icon and ‘Run it as Admin’.

The download also includes some 10 Sample Start Orbs, whose creators have been duly credited there. If you need more, you can always search for them on DeviantArt on on the internet.

 Download Start Button Changer Here 

More Start Buttons (Orbs)

Tuesday, November 22, 2011

Fast Reboot & Shutdown Your PC

This application performs quick reboot and shutdown operations, although they already can be performed elsewhere on your computer. The program is nothing more than two easy-to-understand shortcut icons that are displayed on your desktop after installation. SuperFast Shutdown performs an instant restart or shutdown with a click of its corresponding icon, although it doesn't prompt the user to save open files. Install is easy, but it's packaged as a ZIP file with no help or read-me files. Though this freeware offers nothing new, any user will find it useful for quick reboot or shutdown procedures
Download Here

Windows 7 Folder Background Changer

This freeware portable application, allows you to change the explorer / folder backgrounds in Windows 7.

UPDATE: Windows 7 Folder Background Changer has been updated to v 1.1. This version has the option to uninstall the changes made and restore to original state.

 You can now customize your windows explorer using your favorite wallpaper or photograph!
Using Windows 7 Folder Background Changer, you can also change the color of the text and show shadows under the text to help make your file and sub-folder names stand out! You can even apply the same background to all the sub-folders!


Once you have downloaded and extracted the app, right click on it and Run it as Administrator. Version 1.1 has the option to uninstall the changes made and restore to original state. Before running this or any other tool, do create a System Restore Point first, so that you can always revert back if you feel the need.

Download Here

Dream Scene In Win 7

About Windows DreamScene

Have you ever wished that you could make your desktop background something more exciting than just a regular picture? Would you like to use a video, even a slide show of your favorite pictures, as your desktop background? If so, then you're in luck. Windows DreamScene can make this happen. With Windows DreamScene, you can use a video—either the ones that come with Windows DreamScene, or one of your own—as your desktop background, the same way you would've used a regular picture.

What exactly is Windows DreamScene?

Windows DreamScene is a Windows Ultimate Extra. Windows Ultimate Extras are designed for Windows Vista Ultimate customers to extend Windows features to make using your computer more fun. With Windows DreamScene, you can change your desktop background to a video clip, which runs in a continuous loop to make your desktop come to life. 

Here are some things that you should know before you start using Windows DreamScene.
  • Windows DreamScene supports only WMV and MPG video file formats.
  • To set a video as your desktop background, you must have a video card that supports Windows Aero.
Here are the steps to enable DreamScene:

Step 1: Download and run the DreamScene 1.2 Download Here


Step 2:  Click on "Enable" button and then "finish" . Next is to reboot once!

Step 3: Now once installed correctly, Right click on any video you lick and click on "Set as desktop background" ...Done!


You can pause the video by right clicking on desktop and selecting "Pause DreamScene"


Hide Disk Partition Using Command Prompt

Now hiding the disk partitions is becoming more popular than encrypting the specific drives, because this process takes plenty of time slowing down the PC an creating many problematic issues. Evan third party softwares are also not upto the mark.

Hence in this topic we will hide our specific partitions by the command prompt. It's fast, easy and safe, no need of reboot even!!!
Follow the setps correctly-


Step 1: Open the command prompt from the run window


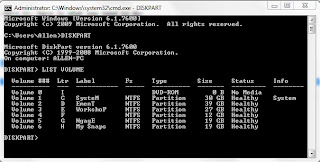
Step 2: Run the prompt with privileged mode, type in diskpart

 Step 3: Then type "list volume"

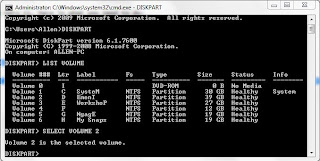
Step 4: Suppose u wanna hide drive e: then type "select volume 3"


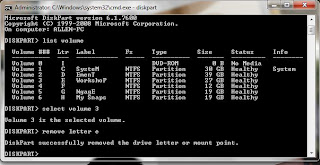
Step 5: Now type "remove letter e". Now a message will come { Diskpart Removed the Drive letter }


Step 6: To access the content of hidden Drive repeat the process mentioned above. But in 5th step replace " remove" to "assign" i mean type "assign letter e"
NJOY :D

Free Disk Space After Installing Nero 11

You can free up your disk space after installling nero 11 as it saves it's files in temp folder, deleting that files would cause no problems, after installation follow these steps-


The latest version of Nero comes with several new features and improvements.
Many of you might have already installed Nero 11 on your Windows 7 PCs.
Though Nero 11 doesn’t support the Developer Preview build of Windows 8, one can follow our how to install Nero 11 on Windows 8 guide to install and use Nero 11 on the latest version of Windows

So, if you would like to free up ~1.9 GB disk space after installing Nero 11, here is what you need to do-


Step 1: Open Run dialog box. To do this, use Windows + R keys.


Step 2: In the Run dialog, type %temp% and hit enter key to open Temp folder.


Step 3: In the Temp folder, locate the folder named NeroInstallFiles and then press Shift + Delete keys to permanently remove the folder from Temp folder and your PC. You are done! Enjoy Nero 11 on your PC.